Lab 6
13 October, 2023 - Trickier Problems
- PyCharm
- Exercise 1: Trying Out Our New Pycharm Environment
- Overview of This Lab
- Exercise 2: conversion2D_1D (standard)
- Exercise 3: enumerate (standard)
- Exercise 4: helper_functions_side_effects (standard)
- Exercise 5: scrabble (challenge, medium)
- Exercise 6: fibonacci (challenge, hard)
- Exercise 7: add (challenge, very hard)
Welcome to week 6!
PyCharm
Starting this week, we’re saying goodbye to CodingBat. From now on, we’ll be using PyCharm to write and test all of our code.
In this lab, we’ll be using and combining all of the techniques and syntax we’ve seen from labs 1 through 5.
Installing Anaconda
To be better prepared for future exercises, we need more than the standard python library that was included with the PyCharm installation. While it is possible to install extra libraries one at the time, it is easier to install the most common libraries all at once into what is called a “python environment”. We will do this by installing a tool called Anaconda. Go to the page, scroll down, choose your operating system and download Anaconda. After downloading, run the installer and follow the instructions.
Open Project
Start by downloading the .zip file for this week’s code at this link. Unzip the file.
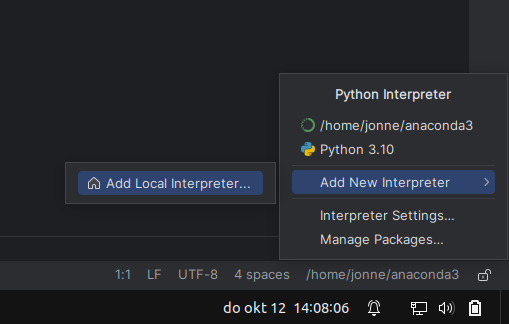
Now open PyCharm and select open and select the folder you just created (when unzipping). To work with the new conda environment, that we just installed, go to the lower corner of your screen where it says /home/user/current_python_installation. Click on it and select Add New Interpreter -> Add Local Interpreter. This should look like the image below.
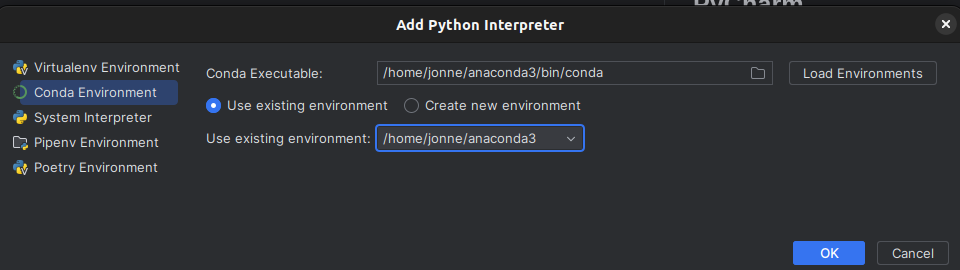
Next, you will see a screen similar to the screenshot down below. At the left side of the popup screen click on conda environment. Then it should already be on use existing environment but if not click that radiobutton. Now, click on ok and from now you should program in this environment.
Configure Unittests
Instead of running the python files in the interpreter, you can also run the unittests in a test environment. The additional benefit of doing this is that you get a file tree on the left hand side with green checkmarks or red/yellow cross for each test. When you click on a tests suite you see all the results for these tests and when clicking on a single test you see only the result of that test. To do this a more elaborate editor is needed such as PyCharm or vscode. In this next section you find how to configure it for PyCharm.
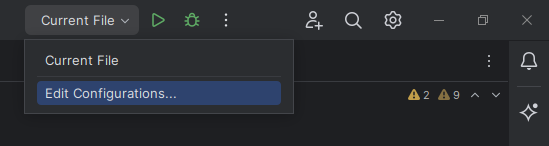
To configure the test environment in PyCharm you go to the dropdown menu next to the run and debug icons in the top right corner. Here, you click edit configurations…, this should like the image below.
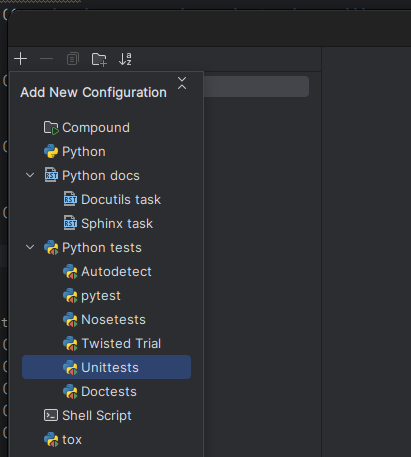
Next, you click on the plus icon in the right upper corner. Go to the python tests and click on unittests. See below, for an example how it would look like.
Next, you can configure what file needs to be tested when the run icon is clicked. However, it is easier to just let everything stand on the default and click ok. Now, go back to the dropdown menu, where you click edit configurations…, but now click current file. This way if you go to another file it runs that file, and you do not reconfigure anything.
Read Unittests Results
Unittests are something new, that you did not see before. However, they are merely a tool for you to check if you work is correct. In large production environment they also function as a safety net to not release wrong code. For now, you do not need to worry about that.
It is important to realize that unittest can not actually test if your code is correct. They just check if for a few example your code gives the correct output. Therefore, you can never rely solely on unittest to check your work. Therefore, normal debug methods are still important.
When an unittest succeeds, it does not print that much (or nothing) in the interpreter screen. However, when something does go wrong it prints out a lot. Important to note, that it will never tell you which line of code is wrong because it can only tell you if your output is wrong, unless there is an error. The screenshot below can help you understand what goes wrong. In the red box, you can find which unittest goes wrong (which is in our case always the name of the function that is wrong). In the green box, you can find which test case goes wrong. For this course we choose to give you several unittest per function. So, if there is an edge case that is wrong the other test are still right. In the yellow box, you can see of which test suite this unittest belongs. When running the test in PyCharm this will be a folder on the lower left hand side. Lastly, the green box tells you how your input is different from the expected input.

Debug Tips
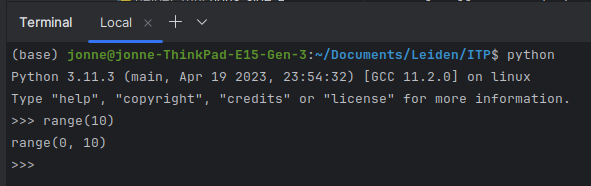
Even though the unittest can help you with understanding what goes wrong in your code. They are not the only tool you have to check your work. One of the easiest way to check if one line of code works the way you think it works is to run python in an interpreter and run the line of code. Running python in the interpreter can be done by just typing python in the interpreter/terminal. See below for an example to see what range returns.
Another option is to suppress the unittests and use print statements. This can be done by changing the VERBOSE at the beginning of the file to 0. Now, only the number of correct and incorrect test cases are shown and your print statements are easier to find/read. Important to note, that this will only work when running the file as a normal .py file and not as a unittest file as we previously configured. There are two ways to run it as a normal .py file. One run it in the terminal by typing python fileName.py. The other option is to redo the steps to run it as an unittest file and instead of unittest click python and by script choose the script you want to run.
Lastly, you can copy the code you want to test to an empty file, at some print statements and run that file.
Exercise 1: Trying Out Our New Pycharm Environment
Try opening lab6_intro.py. Click the “run” button in PyCharm and you should see several yellow or red x’s appear. This is because the code we currently have provided in lab6_intro.py is not correct.
Modify the squared_plus_one function so that it is correct and try running the tests again. Make sure to remove the line that says raise NotImplementedError("Complete the code in this function"). The yellow or red x for TestSquaredPlusOne should be gone, leaving only the yellow or red x for TestRemoveLastItem.
Lastly, modify the remove_last_item function so that it is correct, and try running the tests again. You should get a green check mark, indicating you’ve passed all of the tests. You’re ready to move on to this week’s exercises.
Overview of This Lab
In addition to the warmup exercise earlier, this week we have 6 different exercises that range in difficulty:
- Exercise 2: conversion2D_1D (standard)
- Exercise 3: enumerate (standard)
- Exercise 4: helper_functions_side_effects (standard)
- Exercise 5: scrabble (challenge, medium)
- Exercise 6: fibonacci (challenge, hard)
- Exercise 7: add (challenge, very hard)
All students, regardless of experience, should be able to complete the three standard exercises. Whether you complete all three is up to you.
The three exercises marked as “challenge” provide additional practice for interested students. We believe that any student in this class who completes the standard exercises should be able to complete the “medium” difficulty challenge, which builds on scrabble from an earlier lab.
For more advanced students, you might find the more difficult fibonacci and add exercises to be more interesting. Feel free to skip the standard exercises if you think they are insufficiently challenging.
Exercise 2: conversion2D_1D (standard)
To get more practice with basic Python, we’re going to write some code that works on lists that contains lists. For example, consider the list x = ["cat", 5, ["dog", "cow", "kaas", "koe"]]. This list has 3 items. x[0] is the string “cat”. x[1] is the number 5. x[2] is also a list, in this case of length 4.
Open Conversion2D_1D.py and work your way through the exercises.
Exercise 3: enumerate (standard)
The enumerate function in Python allows us to loop over an iterable (such as a list) and return both the item and the index. In other words enumerate creates an iterator that returns for each item their index. Later in the course, we go in more detail about iterators but for now you can just use it like this for i, item in enumerate(...):. This is also the most common way enumerate is used and the preferred way to get the index of an item instead of for i in range(len(...)):.
Furthermore, this exercise focus on creating new lists, lists in lists, and dictionaries.
Open enumerate.py and work your way through the exercises.
Exercise 4: helper_functions_side_effects (standard)
In lecture, we discussed the idea of functions having side effects. Consider this function:
def set_element_zero_no_side_effects(lst):
   copy_of_lst = lst.copy()
   copy_of_lst[0] = 4
   return copy_of_lst
It sets element 0 to 4 with no side effects. To see this in action, go to this link and step through the code as it runs. You’ll see that set_element_zero_no_side_effects has no effect on lst, i.e. it creates a totally new copy and lst[0] remains "alpha".
By contrast, the function below is dangerous. While it is correct, it also has the side effect of changing lst.
def set_element_zero(lst):
   lst[0] = 4
   return lst
To see this in action, go to this link and watch carefully to see what happens as the code runs.
Open helper_functions_side_effects.py and run the code. You’ll see an incorrect statement printed.
Which function(s) have side effects? How should we best fix the problem? Fix the code so that when you run it, the print statement is true.
Exercise 5: scrabble (challenge, medium)
The last exercise that any student should be able to solve, at this points, is scrabble.py. In this exercise, we continue with the scrabble exercise from last week, but now we are no longer dealing with one word but with a sentence (i.e. a list of strings).
In this exercise, we will focus on summation, creating dictionaries, and searching.
Open scrabble.py and work your way through the exercises.
Exercise 6: fibonacci (challenge, hard)
Fibonacci.py contains some additional exercises that involve creating the fibonacci sequence. This will be the first exercise where using help functions could be useful. Furthermore, the exercise focus on creating lists and lists in lists.
If you don’t think a hard challenge is something for you try to solve the first function def fibonacci_sequence(n):, which is a normal difficulty function. Later on we will come back to the fibonacci sequence when we discuss recursion and it is helpful if you have seen the sequential variant first.
Exercise 7: add (challenge, very hard)
This week we’ve included one especially challenging exercise. This involves adding binary numbers together. This challenge involves string to lists and vise versa and building new lists with several if-statements.