Lab 7
20 October, 2023 - Arrays & Side effects
- PyCharm
- Overview of This Lab
- Exercise 1: Shopping List (standard)
- Exercise 2: Improving Shopping List (standard)
- Exercise 3: Basic Numpy (standard)
- Exercise 4: Arithmetic With Numpy (standard)
- Exercise 5: Declaring a Class (standard)
- Exercise 6: Rotate Colors (challenge, hard)
- Exercise 7: Blurring an Images (challenge, very hard)
- Exercise 8: Make an Image Criminal Friendly (challenge, very hard)
Welcome to week 7!
PyCharm
Starting from last week, we’re saying goodbye to CodingBat. From now on, we’ll be using PyCharm to write and test all of our code. We provide the same manual as last week, just to have easy access to all the information. However, of course do not install Anaconda again. Also, if you have already done the other steps you can skip to the exercises.
In this lab, we’ll be using and combining all of the techniques and syntax we’ve seen from labs 1 through 6.
Installing Anaconda (redundant)
To be better prepared for future exercises, we need more than the standard python library that was included with the PyCharm installation. While it is possible to install extra libraries one at the time, it is easier to install the most common libraries all at once into what is called a “python environment”. We will do this by installing a tool called Anaconda. Go to the page, scroll down, choose your operating system and download Anaconda. After downloading, run the installer and follow the instructions.
Open Project
Start by downloading the .zip file for this week’s code at this link. Unzip the file.
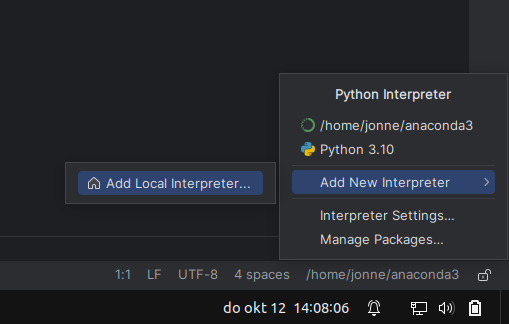
Now open PyCharm and select open and select the folder you just created (when unzipping). To work with the new conda environment, that we just installed, go to the lower corner of your screen where it says /home/user/current_python_installation. Click on it and select Add New Interpreter -> Add Local Interpreter. This should look like the image below.
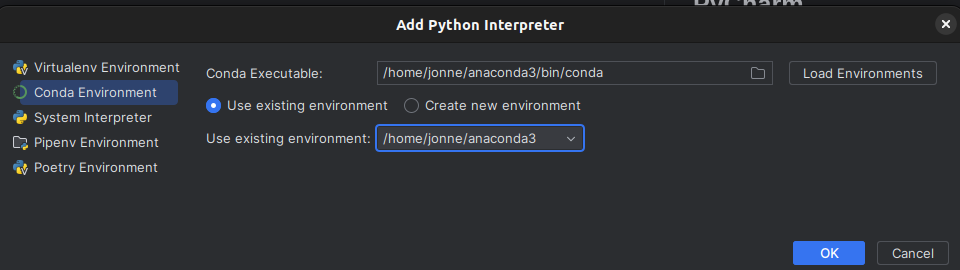
Next, you will see a screen similar to the screenshot down below. At the left side of the popup screen click on conda environment. Then it should already be on use existing environment but if not click that radiobutton. Now, click on ok and from now you should program in this environment.
Configure Unittests
Instead of running the python files in the interpreter, you can also run the unittests in a test environment. The additional benefit of doing this is that you get a file tree on the left hand side with green checkmarks or red/yellow cross for each test. When you click on a tests suite you see all the results for these tests and when clicking on a single test you see only the result of that test. To do this a more elaborate editor is needed such as PyCharm or vscode. In this next section you find how to configure it for PyCharm.
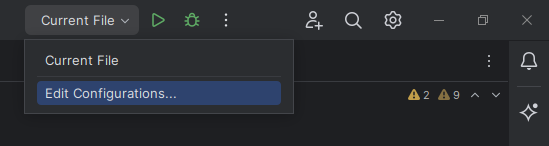
To configure the test environment in PyCharm you go to the dropdown menu next to the run and debug icons in the top right corner. Here, you click edit configurations…, this should like the image below.
Next, you click on the plus icon in the right upper corner. Go to the python tests and click on unittests. See below, for an example how it would look like.
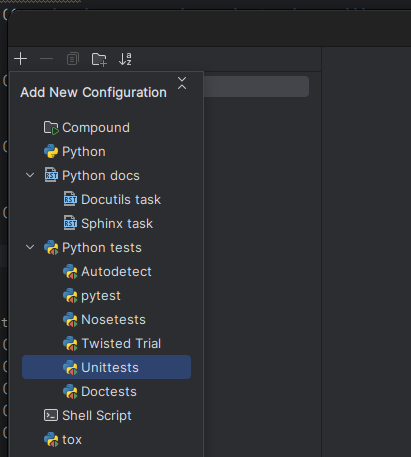
Next, you can configure what file needs to be tested when the run icon is clicked. However, it is easier to just let everything stand on the default and click ok. Now, go back to the dropdown menu, where you click edit configurations…, but now click current file. This way if you go to another file it runs that file, and you do not reconfigure anything.
Read Unittests Results
Unittests are something new, that you did not see before. However, they are merely a tool for you to check if you work is correct. In large production environment they also function as a safety net to not release wrong code. For now, you do not need to worry about that.
It is important to realize that unittest can not actually test if your code is correct. They just check if for a few example your code gives the correct output. Therefore, you can never rely solely on unittest to check your work. Therefore, normal debug methods are still important.
When an unittest succeeds, it does not print that much (or nothing) in the interpreter screen. However, when something does go wrong it prints out a lot. Important to note, that it will never tell you which line of code is wrong because it can only tell you if your output is wrong, unless there is an error. The screenshot below can help you understand what goes wrong. In the red box, you can find which unittest goes wrong (which is in our case always the name of the function that is wrong). In the green box, you can find which test case goes wrong. For this course we choose to give you several unittest per function. So, if there is an edge case that is wrong the other test are still right. In the yellow box, you can see of which test suite this unittest belongs. When running the test in PyCharm this will be a folder on the lower left hand side. Lastly, the green box tells you how your input is different from the expected input.

Debug Tips
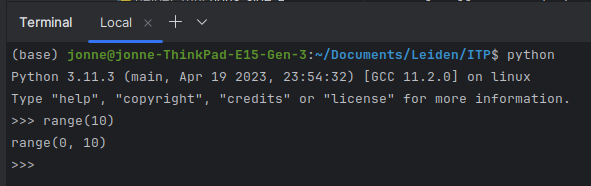
Even though the unittest can help you with understanding what goes wrong in your code. They are not the only tool you have to check your work. One of the easiest way to check if one line of code works the way you think it works is to run python in an interpreter and run the line of code. Running python in the interpreter can be done by just typing python in the interpreter/terminal. See below for an example to see what range returns.
Another option is to suppress the unittests and use print statements. This can be done by changing the VERBOSE at the beginning of the file to 0. Now, only the number of correct and incorrect test cases are shown and your print statements are easier to find/read. Important to note, that this will only work when running the file as a normal .py file and not as a unittest file as we previously configured. There are two ways to run it as a normal .py file. One run it in the terminal by typing python fileName.py. The other option is to redo the steps to run it as an unittest file and instead of unittest click python and by script choose the script you want to run.
Lastly, you can copy the code you want to test to an empty file, at some print statements and run that file.
Overview of This Lab
In addition to the warmup exercise earlier, this week we have 6 different exercises that range in difficulty:
- Exercise 1: Shopping List (standard)
- Ternary Operator (challenge, normal)
- Exercise 2: Improving Shopping List (standard)
- Exercise 3: Basic Numpy (standard)
- Exercise 4: Arithmetic With Numpy (standard)
- Exercise 5: Exercise 5: Declaring a Class(standard)
- Exercise 6: Rotate Colors (challenge, hard)
- Exercise 7: Blurring an Images (challenge, hard)
- Exercise 8: Make an Image Criminal Friendly (challenge, very hard)
All students, regardless of experience, should be able to complete the four standard exercises. Whether you complete all four is up to you.
The three exercises marked as “challenge” provide additional practice for interested students. We believe that any student in this class who completes the standard exercises should be able to complete the “medium” difficulty challenge, which extends exercise 2 by making a pretty print.
For more advanced students, you might find the more difficult Blurring an Images and Make an Image Criminal Friendly exercises to be more interesting. Feel free to skip the standard exercises if you think they are insufficiently challenging.
If you feel that this week’s challenges are too hard for you, feel free to do a challenging exercise from last week which should be easier now that you know more.
Exercise 1: Shopping List (standard)
For this exercise, we’re going to do all of our work in the Python visualizer. There’s no local copy of the code.
Before you start this exercise, make sure you understand exercise 4 of lab 6 (helper_functions_side_effects).
In this exercise, we’ll give you buggy code that you’ll need to fix. Specifically, it gets stuck in an infinite loop.
Let’s try running it. Go to the visualizer and get a feeling for what’s going on.
It’s clear that there’s an infinite loop. Just like in your own programs that you’ll write later, it’s not always clear where the problem lies.
Consider: Is the problem in the removeAll function? Or is it in the script that calls the removeAll function? Or is it in the interaction between the two pieces of code?
Exercise 1A (standard)
In exercise 1A, we’ll fix the problem by ONLY changing the removeAll function so that it has a side effect. Go back to the visualizer and fill in the TODO.
Your new code should modify removeAll so that it has the intended side effect.
Once your code is working correctly, the output should look like:
Buy 4 banana(s).
Buy 2 apple(s).
Buy 1 cheese(s).
Buy 2 bread(s).
Exercise 1B (standard)
Let’s start over again and consider an alternative solution.
Open the visualizer.
This time, you’ll have two different TODOs to fill in.
For the first TODO, modify the function so that it has no side effects, and instead returns a copy of the list lst with all instances of x removed. Then modify the second TODO so that the code works overall. We won’t tell exactly how to do this.
Once your code is working correctly, the output should again look like:
Buy 4 banana(s).
Buy 2 apple(s).
Buy 1 cheese(s).
Buy 2 bread(s).
Now that you’ve solved the problem in two ways, let’s think very carefully about how the two approaches compare. Below, we visualize the return step of the function for both approaches. Note the differences.
First approach (with side effects): 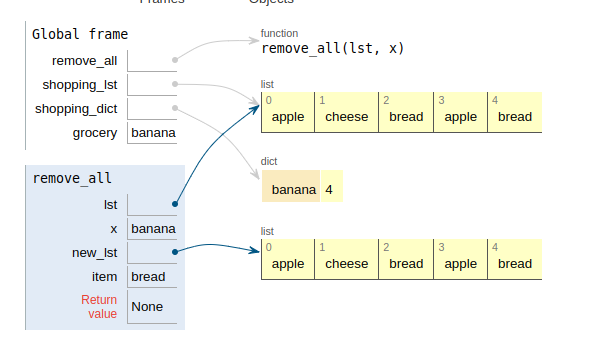
Second approach (no side effects): 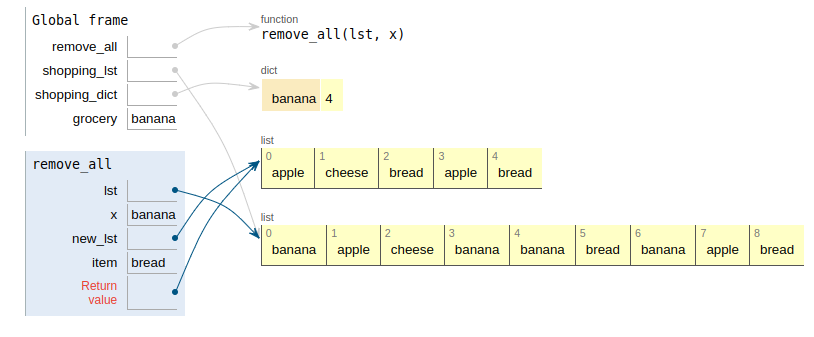
Also consider: Which solution has safer code?
Exercise 2: Improving Shopping List (standard)
In exercise 1A, we fixed the removeAll method so that it had the intended side effects. One quirky thing about our code is that we had to make an entirely new list and then copy everything back.
You might ask, how could I modify the code so that we can iterate over a list and delete items at the same time?
The naive way to do this is given in this code, which unfortunately doesn’t work. Try to analyse what is wrong. Why does it not remove all bananas?
This code is not safe at all, which has to do with the fact that we are looping through the same object while also altering that same object. This is a common problem when removing items from, for example, a list.
Generally, there are two approaches to solve this issue. First, find the items (indices) that you want to remove. Then, after the for loop, remove them (and think about the order). Second, put the whole for loop in a while loop that terminates when nothing get deleted and start the for loop again each time you remove an item. This is quite slow, as you go through the same items each time you start over. Note that there are other solutions and that these approaches should be adjusted for your purpose.
First approach:
del_lst = []
for i, item in enumerate(lst):
    if ...:
        del_lst.append(i)

for i in reversed(del_lst): # think about why it would not work without reversed
    ...
Second approach:
flag = True
while flag:
    flag = False

    for item in lst:
        if ...:
            lst.remove(item)
            flag = True # if nothing is remove during the for loop the while loop ends. This is safe because the default is the while loop ends.
            break
In exercise 1A, the code for the function remove_all was not according to either one of these approaches.
For this exercise rewrite the code for remove_all. You’ll be doing this in PyCharm.
Quick pedagogical note: The code we provided for exercises 1 and 2 is artificial and not a great solution for the problem. Using while shopping_lst: is tricky to get right, as you’ve seen throughout this exercise. A better approach avoids remove operations entirely. Optionally, try to recreate this entire script without having to remove anything from a list at all. Tip: Try to loop only once through shopping_lst and update the dictionary as you go.
Ternary Operator (challenge, medium)
Lastly, we can do a bit of cleanup in the print statement. Now, it always adds an “s” to the name of a grocery even if it is singular. To make it only put an “s” behind plural words we can use a ternary statement. Apply a ternary statement to the print statement to fix the singular plural problem. Below is some explanation about ternary operators.
The idea of a ternary operator is that you can have two outcomes depending on a rule. While Python does not officially have a ternary operator (like C#, C++, Java, etc.), there is a common way of writing them. You should use a ternary operator when the value of a variable should be A in the case of … and otherwise B. It replaces the following code:
if SomeCondition:
    value = 10 #this can be any value
else:
    value = 20
The problem with the code above is that an if else statement can do anything, while a ternary statement signals to the reader that a value is assigned according to some condition. The code above as a ternary statement in Python looks as follows:
value = 10 if SomeCondition else 20
Exercise 3: Basic Numpy (standard)
In this exercise, you will learn how to do basic functionality of numpy (numerical python). There are a lot of functions in the numpy library; here we will focus on the absolute basics. Each function in this exercise will have a numpy function that does the work for you or there is a specific bracket notation [] that you can use.
The joke is often made that coding is just good Googling. This is rather true, in the sense that programmers often do not know all code by heart, but they know when they see a solution for their problem and how to find it. To get more familiar with searching online for solutions, we want you to find the solution online for this exercise. Keep in mind that the answer should be short.
Also, if you are more experienced with coding, python and more specifically numpy, this exercise can be a bit bland, so feel free to skip it. This also is the case for exercise 4.
Open basic_numpy.py and work your way through the exercises.
This exercise focuses on creating numpy arrays, indexing them, and slicing.
Exercise 4: Arithmetic With Numpy (standard)
Arithmetic with numpy arrays works differently from native python lists. The main reason for this difference is that the numpy library is made to be very similar to linear algebra. These days almost all linear algebra expressions can be used directly in python (with numpy). The main difference is that operators work on the values in the array and not on the array itself. For example, when adding two lists, the list becomes bigger: [1, 2] + [3, 4] = [1, 2, 3, 4], while, when adding two numpy arrays, the size of the array stays the same and the values in the array are added: np.array([1, 2]) + np.array([3, 4]) = np.array([4, 6]).
There is a specific operator for each function that you need to implement in this exercise. As seen in the example above, array1 + array2 will add the elements of each array together. Therefore, there is no need for a for loop. This is the same for the functions in this exercise. Do not use a for loop but use operators and, if needed, np.sqrt or np.sum. Feel free to Google what the intended operator should be.
Open arithmetic_numpy.py and work your way through the exercises.
This exercise focuses on arithmetic with numpy arrays.
Exercise 5: Declaring a Class (standard)
To get some practice declaring a class, work your way through person.py. In this class, you’ll define a Person class.
To help guide you, an example class from lecture is given below, with one new method print_score_n_times given as well.
class Student:
    def __init__(self, name, score):
        self.name = name
        self.score = score

    def print_score(self):
        print(f"{self.name} earned a score of {self.score}")

    def print_score_n_times(self, n):
        for i in range(n):
            self.print_score()

s = Student("Frank", 7.7)
s.print_score_n_times(10)
Unimportant note: The example class in lecture declared the class with class Student(object) on the top line, but the (object) is unnecessary.
Exercise 6: Rotate Colors (challenge, hard)
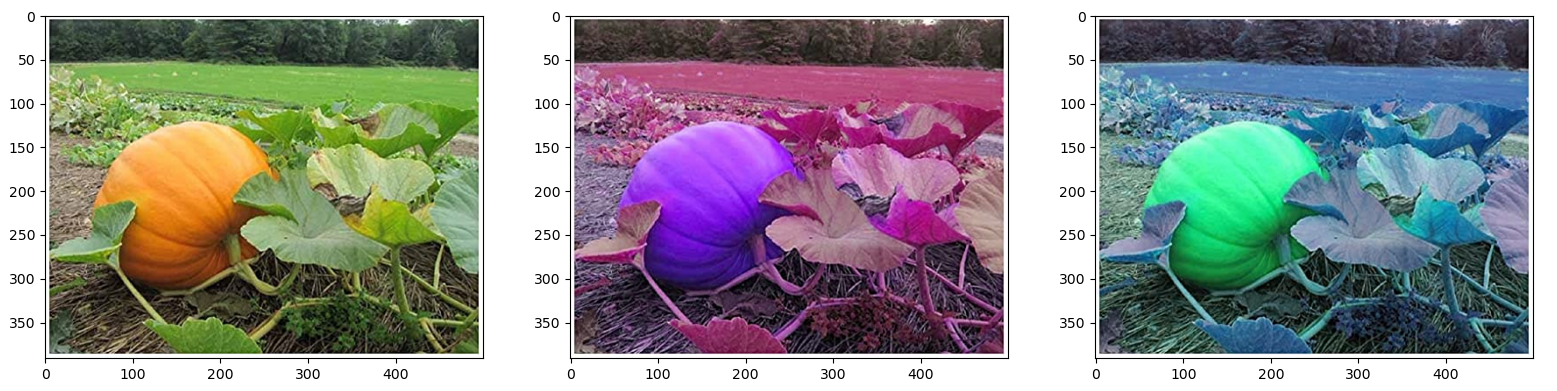
This exercise teaches you how to rotate the colors of an images. This is often one of the basic tools in Photoshop but not hard to implement yourself.
A color is an array of three values. In this exercise, we will rotate or shift each value to the left. This means that the first value becomes the third, the second the first, and the third becomes the second value. For a simplified version of the problem you can have a look at this earlir practice exercise on CodingBat.
Open rotate_colors.py and work your way through the exercises.
In this exercise, we continue with using numpy and slicing arrays. Also, we come back to reference to an object or making a copy of an object.
The end results should look like this:
Exercise 7: Blurring an Images (challenge, very hard)
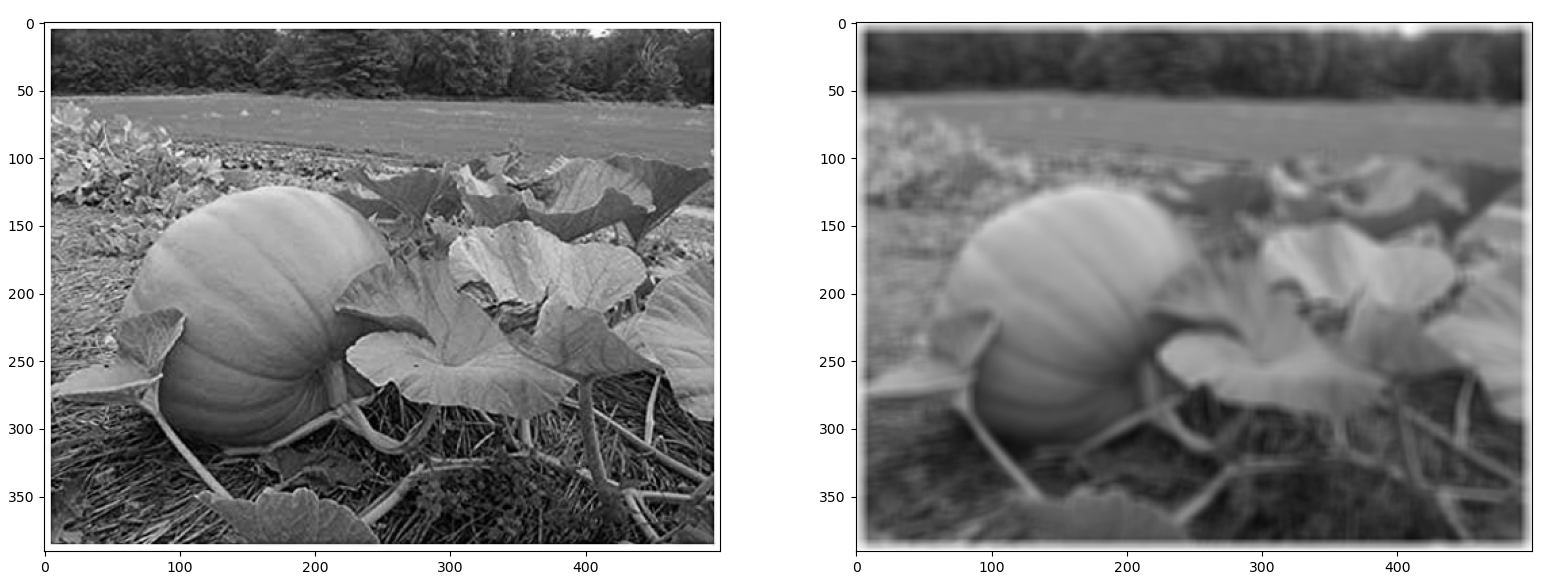
In this exercise, we continue with using numpy. However, this exercise is no longer a simple toy problem, but also has some real world applications. When you complete both functions you will also see the end result of the original and blurred image. Blurring an image has the effect of taking an unsharp photograph. This is done by assigning each pixel the average value of its neighbouring pixels.
The function len is a bit ambiguous when it comes to numpy arrays as they can be multidimensional. To get more readable code, we use size to get the overall size of the numpy array (as if it was a one dimensional list) and shape if we want the length of each axis in the array. Note that shape return a tuple containing the length of each axis. For more information see the numpy documentation.
Open blur_image.py and work your way through the exercises.
This exercise focuses mainly on loops and slicing of numpy arrays.
The end results should look like this:
Exercise 8: Make an Image Criminal Friendly (challenge, very hard)
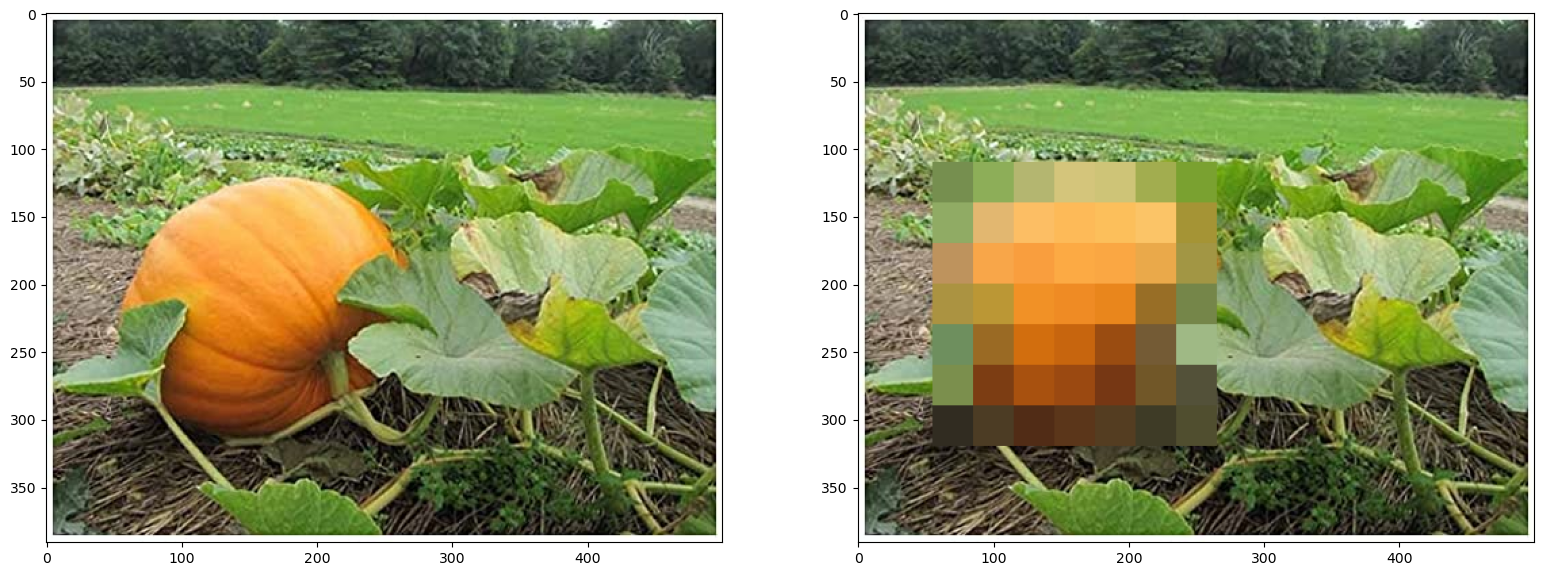
In this exercise, we continue with using numpy and slicing arrays. However, this exercise is no longer a simple toy problem, but also has some real world applications. When, you complete both function you will also see the end result of the original image of a pumpkin and a pixelated pumpkin.
Blurring out the pumpkin or pixelating it is similar to what you see when a face is made unrecognizable on tv. This is done by creating the effect of locally reducing the pixel density. In this exercise, we will do this by making patches of 30x30 pixels and giving all the pixels in a patch the same color value.
Open pixelate_image.py and work your way through the exercises.
This exercise focuses mainly on loops, slicing of numpy arrays and finding a point in an image.
The end results should look something like this: